
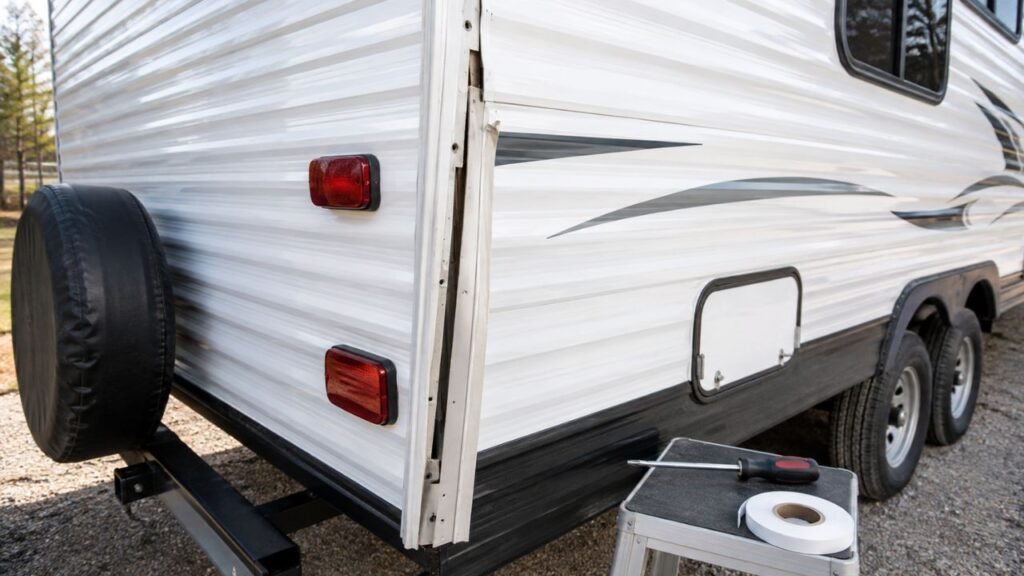
Your RV corner trim usually pulls away because vibration loosens its screws, the sealing tape deteriorates, or moisture rots the backing underneath. Temperature changes, highway wind, corrosion, and previous repairs can also weaken the joint.
This guide will help you identify the cause, inspect hidden damage, repair the trim correctly, and prevent the problem from returning.
Key Takeaways
- Loose corner trim can expose your RV wall to water.
- Road vibration commonly loosens screws and enlarges their mounting holes.
- Rusted screws may indicate moisture behind the trim channel.
- Soft or rotten backing cannot hold replacement screws securely.
- Tightening existing screws does not fix failed sealing tape.
- Butyl tape normally seals the area behind the metal trim.
- Exterior sealant protects exposed edges but cannot replace bedding tape.
- Large gaps, soft walls, and delamination need professional attention.
- Repairing the trim early can prevent expensive structural damage.
Why Is My RV Corner Trim Pulling Away?
RV corner trim covers the joint where two exterior wall sections meet. It also helps protect the wall edge from rain, road spray, wind, and movement.
The trim is normally attached with screws and sealed with bedding material. A flexible vinyl strip then covers the screw heads.
Over time, road vibration can loosen those fasteners. Heat and cold can also make the wall and trim move differently. Once a small gap appears, highway airflow may pull the trim farther outward.
Water can then enter behind the trim. That moisture may damage the wall framing, insulation, flooring, and interior panels.
A small loose section may only need resealing and new fasteners. However, repeated separation often points to damaged backing or hidden water intrusion.
Common Causes of RV Corner Trim Separation
Several problems can create the same visible gap. The screw condition, surrounding wall, and trim location usually reveal the underlying cause.
Loose Screws From Road Vibration
Your RV experiences constant movement while traveling. Rough roads, potholes, frame flex, and trailer sway all place stress on exterior joints.
That movement can slowly loosen corner trim screws. The holes may also widen slightly as the fasteners move inside them.
You may notice only one loose section at first. However, nearby screws may already be losing their grip.
Rusted, Broken, or Stripped Fasteners
Factory screws can corrode after moisture reaches the trim channel. Their threads may weaken, while the screw heads become difficult to remove.
Some screws may turn without tightening. Others may break when you attempt removal.
A spinning screw usually means the mounting hole is enlarged. It can also indicate damaged or rotten backing behind the wall.
Rotted Wood Behind the Trim
Water intrusion is one of the most serious causes. Moisture can enter through failed roof seams, clearance lights, windows, or the loose trim itself.
Once the wooden backing becomes soft, screws lose their holding strength. Installing larger screws may provide only temporary improvement.
The trim may pull away again because the surrounding material continues deteriorating.
Failed Butyl Tape or Bedding Sealant
Most corner trim sits over flexible sealing material. This bedding layer fills small gaps between the wall and trim.
Old putty tape can dry, shrink, crack, or squeeze outward. Butyl tape may also fail when poorly installed or repeatedly exposed to movement.
Once the seal fails, water can travel behind the channel. The trim may also lose support and begin lifting.
Heat, Cold, and Material Expansion
RV walls contain several different materials. Aluminum trim, fiberglass panels, wood framing, and sealants respond differently to temperature changes.
Hot weather makes some materials expand. Cold weather makes them contract.
Repeated movement can weaken sealant, loosen screws, and open small gaps along the seam.
Wind Pressure While Driving
A tightly installed trim section normally handles highway airflow without difficulty. However, even a small lifted edge can catch the wind.
The airflow then pulls against the loose section continuously. A minor gap may become noticeably larger during a long trip.
This is why flapping trim should be secured before highway travel.
Previous Repairs Using Incorrect Materials
Earlier repairs sometimes create new problems. Common mistakes include short screws, household caulk, excessive adhesive, or missing bedding tape.
A repair may look sealed from outside while moisture remains trapped underneath. Incorrectly placed screws may also miss the supporting frame.
The trim then starts separating again after several trips.
Collision or Impact Damage
Tree branches, campsite posts, storage doors, ladders, and other objects can strike an RV corner.
Even a minor impact may bend the aluminum trim. It can also crack the seal or distort the wall edge.
Bent trim may not sit flat, even after tightening its screws.
Wall Delamination or Structural Movement
Sometimes the trim is not the original problem. A separating wall panel or shifting frame can push the trim outward.
Look for ripples, bubbles, bulges, or uneven wall surfaces nearby. Those symptoms may indicate delamination or deeper structural movement.
In that situation, replacing screws alone will not solve the problem.
What the Location of the Loose Trim Can Tell You
The location and appearance of the separation can narrow your inspection. Use the following table as a starting point.
| Trim Condition or Location | Possible Cause | What You Should Inspect |
| Gap near the roof | Failed roof seam or upper screw damage | Roof sealant, corner cap, clearance lights, and upper wall |
| Separation near the bottom | Floor-edge rot or road spray intrusion | Lower framing, underbelly, flooring, and bottom screw holes |
| Entire corner feels loose | Failed bedding tape or multiple loose fasteners | Full trim channel, every screw, and wall backing |
| One or two screws spin | Stripped holes or localized backing damage | Individual holes and surrounding wall material |
| Rust stains appear | Water intrusion and corroded screws | Screw channel, bedding tape, and nearby leak sources |
| Trim returns loose after repair | Rotten backing or wall movement | Framing condition, delamination, and screw placement |
| Siding bulges beside trim | Moisture damage or delamination | Exterior panel bonding and internal moisture |
| Damage follows an impact | Bent trim or broken wall edge | Trim shape, siding cracks, and internal framing |
This table helps identify possibilities, but it does not replace inspection. Water can travel inside an RV wall before appearing elsewhere.
Signs the Loose Trim Has Caused Water Damage
A visible gap may only be the first warning. Check the surrounding interior and exterior areas for additional moisture symptoms.
- Soft or spongy exterior wall sections
- Swollen interior wall panels
- Dark stains around screws
- Rusted screw heads
- Musty odors inside cabinets
- Discolored flooring near the corner
- Damp insulation behind access panels
- Bubbling or rippled fiberglass siding
- Crumbling wood around screw holes
- Water stains beneath nearby windows
- Wet underbelly material
- Mold or mildew around interior trim
- Recurring moisture after rainfall
- Sealant that looks cracked or separated
Do not ignore a musty smell because the wall feels dry. Insulation and wood can hold moisture long after the surface dries.
How to Inspect RV Corner Trim Safely
Inspect the complete corner before tightening anything. A careful inspection prevents you from hiding rot or trapping moisture.
- Park your RV on level ground.
- Choose a dry day with good visibility.
- Inspect the corner from roof to underbelly.
- Look for gaps, dents, cracks, and missing sealant.
- Press gently around the surrounding wall.
- Check for softness or unusual movement.
- Lift part of the vinyl screw-cover strip carefully.
- Inspect the exposed screws for rust.
- Test whether several screws feel loose.
- Check nearby roof seams and clearance lights.
- Inspect windows, storage doors, and wall penetrations.
- Examine the matching interior corner.
- Look behind cabinets when access is available.
- Use a moisture meter if damage seems hidden.
- Mark the loose section before beginning repairs.
Do not push hard against a fiberglass wall. Excessive pressure can worsen delamination or crack a weakened panel.
You should also avoid removing the entire trim during rain. Once removed, the wall joint becomes more exposed to moisture.
Can I Simply Tighten the Existing Screws?
You may tighten the screws when the trim has only moved slightly. The surrounding wall must feel firm, and the screws must still hold securely.
Tighten each screw gently and observe the trim. It should sit flat without bending or crushing the wall surface.
Stop immediately when a screw continues spinning. That hole is probably stripped, enlarged, or surrounded by damaged backing.
Tightening also will not restore failed butyl tape. The trim may sit closer temporarily while the joint remains vulnerable to leaks.
Avoid using maximum drill torque. Excessive force can strip additional holes, deform aluminum trim, or crack fiberglass siding.
How to Fix RV Corner Trim That Is Pulling Away
The correct repair depends on the damage underneath. Your goal is to restore solid fastening and create a continuous waterproof seal.
Gather the Correct Tools and Materials
Prepare everything before opening the wall seam. Leaving the trim removed for several days increases weather exposure.
- Screwdriver or low-torque drill
- Plastic trim-removal tool
- Plastic scraper
- Replacement stainless steel screws
- Correctly sized drill bits
- Butyl tape
- RV-compatible non-sag exterior sealant
- Approved surface cleaner
- Clean cloths
- Replacement vinyl screw-cover insert
- Moisture meter
- Masking tape
- Protective gloves
- Safety glasses
Confirm that every cleaner and sealant is compatible with your siding. Some strong solvents can damage fiberglass coatings or painted aluminum.
Remove the Vinyl Screw-Cover Insert
The flexible vinyl insert normally runs through the center channel. It hides and protects the corner trim screws.
Start at one end and lift it carefully. A plastic tool helps prevent scratching the metal.
Old vinyl often becomes stiff, shrunken, or brittle. Replace it when it cracks during removal or no longer fills the channel.
Remove the Loose Corner Trim
Remove the screws gradually instead of starting at one end. This approach prevents the trim from twisting unexpectedly.
Support long trim sections while removing the final screws. Aluminum molding can bend easily when left hanging.
Take photographs before complete removal. Those images can help you restore the original position and screw pattern.
Remove Old Putty Tape and Sealant
Peel away the old bedding material from both surfaces. Use a plastic scraper to avoid damaging the siding.
Remove dried sealant from the trim edges. Do not use aggressive metal tools against fiberglass.
Clean the area with a compatible product. The new tape needs a clean, dry surface to seal properly.
Inspect the Wall Edge and Screw Backing
Examine every exposed screw hole. Look for wet wood, rust, dark staining, enlarged holes, and crumbling material.
Firm backing should resist gentle pressure. Rotten backing may feel soft or break apart easily.
Also inspect the wall panel alignment. A bulging or separated panel may require structural repair before trim installation.
Allow damp material to dry completely. Sealing wet wood inside the wall can accelerate decay and mold growth.
Repair Stripped Screw Holes
A mildly enlarged hole may accept a slightly larger approved screw. The new fastener must still enter solid backing.
Another option is placing a new pilot hole slightly beside the damaged one. However, the new location must align with structural material.
Seal the abandoned hole before reinstalling the trim. Otherwise, it can become a hidden water pathway.
Do not install unusually long screws without checking the wall construction. Wiring, plumbing, and appliances may sit close behind the panel.
Repair Rotted Framing Before Reinstalling the Trim
Rotten wood cannot support a lasting repair. Damaged material must be removed, reinforced, or replaced.
Small localized damage may be accessible from the exterior edge. Larger areas can require opening the interior or exterior wall.
The replacement backing should provide solid support for each screw. It must also be completely dry before resealing.
This repair can become complicated quickly. Professional help is sensible when rot extends beyond the visible corner.
Apply New Butyl Tape Behind the Trim
Apply a continuous strip of butyl tape along the back. Avoid leaving gaps where water could pass through.
Keep the tape centered over the wall joint. It should cover the screw locations and sealing surface evenly.
Do not stretch butyl tape while installing it. Stretched tape may shrink later and create exposed areas.
Press the trim gently against the wall. The tape should compress without squeezing entirely from behind the channel.
Reinstall the Trim Without Overtightening
Position the trim carefully before installing screws. Confirm that it follows the corner evenly from top to bottom.
Start several screws loosely to hold the alignment. Then work gradually along the channel.
Tighten the screws enough to compress the tape. Stop before the trim bends or the wall surface distorts.
Use a low drill clutch setting when possible. Final hand tightening provides better control.
Seal the Trim Edges and Screw Heads
Some trim designs require exterior sealant along exposed edges. Use a flexible, RV-compatible product intended for vertical surfaces.
Do not rely on exterior caulk alone. The bedding tape behind the trim provides the primary hidden seal.
Cover screw heads only when recommended for that trim design. Excess sealant inside the channel can make future repairs difficult.
Pay special attention to the upper end. Water entering from above can travel behind the entire trim section.
Install a New Vinyl Insert
Allow any required sealant to cure according to its instructions. Then press the vinyl insert into the center channel.
Begin at one end and work along the trim. Avoid stretching the insert during installation.
Trim the ends only after the strip sits naturally. Stretched vinyl can shrink and expose screws later.
Test the Repair for Leaks
Wait until all sealant has cured before water testing. Premature testing can disturb the fresh seal.
Use a gentle stream of water rather than high pressure. Begin below the repair and slowly work upward.
Have someone inspect the interior during testing. Watch the repaired area for several minutes after the water stops.
Never aim a pressure washer directly at the seam. High pressure can force water past otherwise serviceable seals.
What Type of Screws Should I Use for RV Corner Trim?
Use corrosion-resistant fasteners that match your RV construction. Stainless steel screws are commonly chosen because they resist rust.
However, the correct screw depends on the trim shape, wall thickness, and backing material. The head must fit properly inside the trim channel.
Match the original length whenever the backing remains intact. A slightly larger diameter may help with mildly stripped holes.
Longer is not automatically better. An oversized screw can contact wiring, plumbing, or hidden structural components.
Avoid mixing incompatible metals when corrosion is a concern. Check manufacturer guidance when your RV uses aluminum framing or specialty panels.
The screw should pull the trim snugly against the wall. It should not crush the siding or sink deeply into the channel.
Should I Use Butyl Tape, Putty Tape, or Caulk?
These products perform different jobs. Choosing the correct material is essential for a lasting, watertight repair.
Butyl Tape
Butyl tape remains flexible and creates a bedding seal. It is commonly installed behind exterior trim, windows, and access doors.
The tape conforms to small surface irregularities. It also continues sealing while the RV experiences normal movement.
Use the correct width and thickness for your trim. The tape should not be stretched during installation.
Traditional Putty Tape
Putty tape appears on many older RVs. It is inexpensive and easy to work with during installation.
However, it can dry, crack, and shrink over time. Old putty may feel hard or crumble during removal.
When replacing failed putty, many owners prefer quality butyl tape. Product compatibility should still be confirmed first.
Exterior RV Sealant
Exterior sealant protects exposed edges, joints, and fastener areas. Vertical seams normally require a non-sag formulation.
Sealant remains an important secondary defense. However, it cannot replace the bedding tape behind the trim.
Choose a product compatible with fiberglass, aluminum, paint, and existing sealants. Incompatible products may separate or damage the surface.
Products to Avoid
Household bathroom silicone is usually a poor choice. It can adhere unpredictably and make future surface preparation difficult.
Rigid construction adhesive can prevent normal movement. It may also damage siding during future removal.
Avoid interior caulk, expanding foam, and unapproved roof coatings. Each can hide the problem without creating a proper repair.
Mistakes to Avoid When Repairing Loose Corner Trim
A rushed repair can look acceptable while moisture continues entering. Avoid these common mistakes during inspection and installation.
- Applying sealant over dirty surfaces
- Sealing damp or rotten wood
- Tightening screws without checking the backing
- Using longer screws without checking wall depth
- Reusing brittle bedding tape
- Filling the joint only with exterior caulk
- Overtightening and bending the trim
- Driving screws into unsupported wall material
- Leaving abandoned screw holes unsealed
- Stretching the vinyl insert
- Ignoring roof seams above the damaged corner
- Using a pressure washer for leak testing
- Covering rust without finding the moisture source
- Reinstalling bent trim that cannot sit flat
- Assuming every loose corner has the same cause
Take time to identify why the trim moved. Fixing only the visible gap often leads to another repair later.
When Does the Corner Trim Need Complete Replacement?
Straight and undamaged trim can often be cleaned and reused. Replace it when its shape or fastening surface prevents reliable sealing.
- The metal channel is bent or twisted.
- Multiple screw holes are torn open.
- Corrosion has weakened the aluminum.
- The trim no longer matches the wall contour.
- The vinyl insert channel is damaged.
- An impact has crushed the corner profile.
- Old adhesive cannot be removed safely.
- The trim has cracked around fastener holes.
- Replacement is required during structural reconstruction.
Compare the replacement profile carefully with the original. Small differences can affect screw placement, vinyl fit, and sealing coverage.
When Should I Call an RV Repair Professional?
Professional inspection is recommended when the surrounding wall feels soft. That softness often means moisture has reached the structural backing.
You should also seek help when the trim separates repeatedly. Recurring movement can indicate framing damage, delamination, or wall alignment problems.
Large areas of rot may require partial wall reconstruction. This work can involve siding, insulation, framing, wiring, and interior panels.
Call a technician when the corner contains hidden plumbing or electrical systems. Incorrect screw placement can create additional damage.
Professional help is also sensible when the trim sits near a slide-out opening. Slide alignment and wall structure require careful evaluation.
How Much Does RV Corner Trim Repair Cost?
Repair cost depends on damage depth and trim length. Labor rates, materials, wall construction, and accessibility also affect the final amount.
| Repair Level | Work Usually Required | Relative Cost |
| Minor screw repair | Replace several fasteners and seal small openings | Low |
| Partial trim reseal | Remove a short section and install new bedding tape | Low to moderate |
| Full corner reseal | Remove, clean, reseal, and reinstall the entire trim | Moderate |
| Complete trim replacement | Install new molding, screws, sealant, and vinyl insert | Moderate |
| Localized backing repair | Remove damaged wood and install solid support | Moderate to high |
| Wall reconstruction | Repair framing, insulation, siding, and interior panels | High |
| Delamination repair | Stabilize or rebuild separated laminated wall sections | High |
A low-cost exterior repair becomes expensive when rot is ignored. Early inspection usually saves both labor and materials.
How to Prevent RV Corner Trim From Pulling Away Again
Routine exterior checks can catch movement before water reaches the wall. Include corner trim in your regular RV maintenance schedule.
- Inspect corner seams every three to six months.
- Check the trim before and after long trips.
- Inspect again after driving on rough roads.
- Replace cracked or shrunken vinyl inserts.
- Repair damaged roof sealant promptly.
- Check nearby clearance lights for leaks.
- Look for rust around exposed fasteners.
- Use only RV-compatible sealants.
- Avoid directing pressure washers at seams.
- Keep lower wall edges clean and dry.
- Store the RV under cover when practical.
- Inspect after severe heat or freezing weather.
- Record repairs with photographs and dates.
- Test repaired areas after heavy rain.
- Address small gaps before highway travel.
The upper corner deserves special attention. Water often enters above the visible separation and travels downward internally.
Is Loose RV Corner Trim an Emergency?
A small, stable gap is not always a roadside emergency. However, it should be protected from rain and repaired promptly.
Large trim sections can become dangerous while driving. Wind may bend the metal, enlarge the gap, or detach the molding completely.
Do not tow at highway speed when the trim is flapping. Secure it safely or arrange repairs before continuing.
Water exposure creates another urgent concern. Cover the area temporarily when rain is expected, but avoid trapping existing moisture.
Temporary Fixes Before a Permanent Repair
Temporary measures should only protect the RV until proper repairs begin. They should not become permanent substitutes for inspection.
- Dry the loose area thoroughly.
- Remove dirt from the surrounding surface.
- Secure flapping trim without overtightening.
- Use removable waterproof repair tape when suitable.
- Cover exposed screw holes from rainfall.
- Avoid forcing caulk into a wet cavity.
- Reduce highway travel until the trim is secure.
- Inspect the interior after every rainfall.
- Schedule a permanent repair promptly.
Do not use permanent adhesive as an emergency shortcut. It can complicate correct removal and hide continuing wall damage.
Final Thoughts
Loose RV corner trim may look like a minor cosmetic problem. However, that trim protects one of your RV’s most vulnerable exterior joints.
Start by checking the screws, sealant, wall firmness, and nearby leak sources. Do not simply tighten everything and cover the gap with caulk.
A dependable repair needs solid backing, continuous butyl tape, suitable fasteners, and compatible exterior sealant. Each part protects the wall differently.
When you address the problem early, the repair is usually manageable. Waiting can allow moisture to damage framing, insulation, flooring, and interior panels.
Take your time during inspection and avoid hiding warning signs. A careful repair now can prevent a much larger rebuilding project later.
Related FAQs
Can Water Enter Behind Loose RV Corner Trim?
Yes, even a narrow opening can allow rainwater behind the trim. Water may then travel through screw holes, wall joints, insulation, and framing.
Why Do My RV Corner Trim Screws Keep Coming Loose?
Repeated loosening usually indicates stripped holes, weak backing, vibration, or wall movement. The screws must enter solid material before they can hold reliably.
Can I Use Larger Screws in the Existing Holes?
A slightly larger screw may work when the backing remains solid. Rotten wood, enlarged holes, or hidden components require further inspection before changing screw size.
Should RV Corner Trim Be Sealed on Both Sides?
Sealing requirements vary between trim designs and manufacturers. The bedding tape behind the trim remains essential, even when exposed edges also receive sealant.
Can I Repair RV Corner Trim Without Removing It?
Minor loosening may be corrected without complete removal. Failed bedding tape, rusted fasteners, hidden moisture, or rotten backing usually requires removing the affected section.
How Long Does RV Corner Trim Sealant Last?
Sealant lifespan depends on weather, storage, surface preparation, movement, and product quality. Regular inspection matters more than relying on a fixed replacement schedule.
Can Loose Corner Trim Cause RV Delamination?
Yes, continuing water intrusion can weaken the bonding inside laminated walls. This may create bubbles, ripples, soft areas, or separated exterior panels.
Can I Use Silicone on RV Corner Trim?
Household silicone is generally not recommended for this repair. Use an RV-compatible sealant designed for your siding material and vertical exterior joints.
Should I Replace Every Screw When Resealing the Trim?
Replace rusted, damaged, or unsuitable screws. Reusable fasteners should still be inspected carefully before the trim is reinstalled.
Does RV Insurance Cover Loose Corner Trim?
Coverage depends on the damage cause and policy terms. Sudden impact damage may be treated differently from gradual deterioration, poor maintenance, or long-term leaks.
Can Highway Wind Make Loose Trim Worse?
Yes, airflow can catch a lifted trim edge and pull it outward. Secure large or flapping sections before driving at highway speed.
How Do I Know Whether the Wood Behind the Trim Is Rotten?
Rotten backing may feel soft, look dark, crumble around screws, or fail to hold fasteners. A moisture meter can help locate hidden damp areas.

David Marshall shares travel route insights, mileage planning tips, and road-tested advice. His writing helps travelers understand distance, timing, and equipment choices. Every article is built around clarity and real-world usefulness.











