
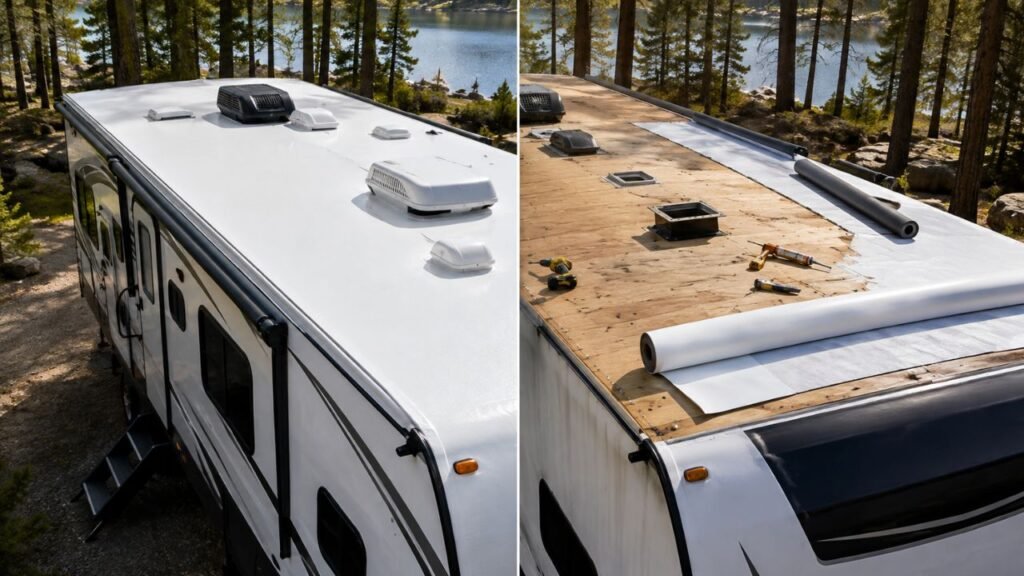
An RV roof coating is usually the better choice when the existing roof is dry, firmly attached, and structurally sound. A full roof replacement is necessary when you find rotten decking, widespread soft spots, trapped moisture, severe membrane failure, or damaged roof framing.
This guide will help you inspect the damage, compare both options, understand costs, and choose the repair that genuinely protects your RV.
Key Takeaways
- A roof coating protects an existing roof but cannot rebuild it.
- Soft, spongy, or sagging areas often indicate structural water damage.
- Active leaks must be located and repaired before applying coating.
- Coating works best on weathered roofs with solid underlying decking.
- Replacement exposes hidden damage and allows wet materials to be removed.
- Proper surface preparation determines how well a coating will perform.
- Never choose coating based only on its lower initial cost.
RV Roof Coating vs Full Roof Replacement at a Glance
Both options can protect your RV from future water intrusion. However, they address completely different levels of roof deterioration.
| Comparison Point | RV Roof Coating | Full Roof Replacement |
| Best for | Surface wear on a sound roof | Structural or widespread roof failure |
| Existing membrane | Usually remains installed | Usually removed |
| Roof decking | Must already be firm | Damaged sections can be replaced |
| Wet insulation | Cannot correct it | Can be removed and replaced |
| Hidden damage | May remain concealed | Becomes visible during removal |
| Project difficulty | Moderate | High |
| DIY suitability | Possible for experienced owners | Usually better for professionals |
| Project time | Generally shorter | Generally longer |
| Upfront cost | Lower | Significantly higher |
| Final result | Extends the current roof’s life | Rebuilds the roof system |
| Main limitation | Cannot fix structural damage | Expensive and labor-intensive |
The biggest difference is simple. Coating preserves a roof, while replacement rebuilds one.
What Is an RV Roof Coating?
An RV roof coating is a liquid material applied over an existing roof. Once cured, it creates a continuous protective layer across the surface.
Depending on the product, the coating may improve waterproofing, UV resistance, reflectivity, and flexibility. It can also cover minor surface cracking and weathered areas.
However, coating does not replace damaged plywood, framing, insulation, or adhesive. It only protects the roof structure that remains beneath it.
You should think of coating as restoration rather than reconstruction. It works well when your roof has aged but has not structurally failed.
What Does a Full RV Roof Replacement Include?
A full roof replacement involves removing most or all existing roof material. This allows the decking, insulation, framing, and attachment points to be inspected.
The technician may remove roof vents, skylights, antennas, air conditioners, trim pieces, and other mounted equipment. The old membrane is then pulled away from the roof decking.
Any rotten wood, wet insulation, damaged framing, or loose adhesive must be repaired. A new membrane or roof surface is then installed.
Finally, the removed fixtures are reinstalled and carefully sealed. The roof edges, seams, fasteners, and penetrations also receive new sealant.
Replacement takes longer because it addresses the entire roof assembly. However, it provides access to damage that coating would simply cover.
When Is an RV Roof Coating the Better Choice?
A roof coating makes sense when deterioration remains near the surface. The underlying roof must still be dry, stable, and strong.
The Roof Decking Feels Firm
Your roof should feel consistently firm across accessible areas. It should not feel spongy, unusually flexible, or weak under light pressure.
A small amount of roof movement may be normal. RV roofs naturally flex while traveling and during temperature changes.
However, one area feeling noticeably softer than surrounding sections deserves attention. That softness may indicate damaged decking, failed adhesive, or moisture below.
Always confirm whether your RV roof is designed for walking. Some roofs require ladders, support boards, or professional inspection methods.
The Membrane Is Still Securely Attached
The roof membrane should remain bonded to the surface below it. Small wrinkles or mild surface aging may not automatically require replacement.
Large bubbles, loose sections, lifting edges, or extensive separation create bigger concerns. Coating over loose material will not securely reattach it.
The new coating can only perform as well as the surface underneath. A detached membrane creates an unstable foundation for every layer above it.
The Damage Is Mostly Surface-Level
Coating is often suitable when the visible damage is cosmetic or superficial.
Common coating candidates include:
- Chalking or powdery roof surfaces
- Fading caused by sunlight exposure
- Mild surface oxidation
- Fine surface-level cracking
- Aging factory finishes
- Previously repaired small punctures
- Minor sealant deterioration
- Worn areas around roof access paths
- A roof that has become difficult to maintain
These conditions suggest aging rather than structural failure. They still require cleaning, inspection, and localized repairs before coating.
There Is No Significant Trapped Moisture
The roof assembly must be dry before applying a waterproof coating. Sealing moisture inside can create a hidden and growing problem.
Trapped water may continue damaging plywood, adhesives, insulation, and framing. The finished roof might look clean while deterioration continues underneath.
Interior stains, musty smells, swelling, or repeated leaks deserve further investigation. Do not assume several sunny days have completely dried the roof.
Moisture can remain trapped between the membrane and decking. It can also collect inside insulation or ceiling materials.
The Existing Roof Is Compatible With the Coating
Not every roof coating works on every RV roof material. EPDM, TPO, PVC, fiberglass, aluminum, and older coatings have different requirements.
Some surfaces need specialized cleaners, primers, or seam products. Others may reject the coating because of contamination or incompatible sealants.
Silicone residue can create particularly difficult adhesion problems. Many products will not bond properly over cured silicone.
Read the coating instructions carefully before starting. Confirm compatibility with the exact roof material, not simply “rubber roofing.”
When Does an RV Roof Need Full Replacement?
Replacement becomes necessary when damage extends beneath the visible surface. Coating cannot restore structural strength or remove contaminated materials.
Large Soft Spots or Spongy Decking
A soft roof area often means the decking has absorbed water. Plywood and composite panels lose strength as moisture causes swelling, separation, or rot.
Coating might stop additional rainwater from entering. However, it cannot make weakened decking solid again.
Large soft sections should be opened and examined. The damaged material must usually be removed before the roof becomes safe again.
Ignoring soft spots can allow the affected area to spread. Roof-mounted equipment may also lose proper support around damaged decking.
Sagging or Structural Movement
Visible dips or sagging areas can indicate damaged decking or framing. They may also allow water to collect rather than drain properly.
Watch for unusual movement around air conditioners, vents, skylights, and roof racks. Heavy fixtures need firm support beneath their mounting points.
If the roof visibly changes shape under pressure, do not coat it immediately. The cause should be identified before sealing the surface.
Structural movement may require replacing framing members, decking, or attachment hardware. Those repairs require access beneath the roof membrane.
Extensive Water Damage
Long-term water intrusion rarely stays in one small location. Moisture can travel through insulation, framing, ceiling panels, and wall cavities.
Possible warning signs include:
- Repeated ceiling stains
- Soft or swollen ceiling panels
- Musty interior odors
- Visible mold growth
- Wet insulation
- Peeling wall coverings
- Interior delamination
- Rusted screws or fasteners
- Damaged cabinets near exterior walls
- Water marks around roof fixtures
- Persistent leaks after resealing
- Soft areas near roof edges
A coating may prevent future exposure after repairs. It cannot reverse damage that has already developed inside the roof.
Severe Membrane Failure
A badly deteriorated roof membrane may no longer provide a reliable coating surface. The material might be torn, shrinking, brittle, loose, or heavily separated.
Small punctures can sometimes be repaired before coating. Widespread tears or deep cracks create a different situation.
Shrinking membranes can pull away from side rails, end caps, vents, and corners. Coating rarely corrects the tension causing that movement.
Large detached sections may also hold moisture underneath. In these cases, removal often provides a more dependable repair.
Repeated Leaks Continue After Repairs
A leak returning after several repairs may indicate a deeper problem. The visible entry point might not be the actual source.
Water can enter near one fixture and travel underneath the membrane. It may appear inside several feet away.
Repeated leaks may involve wet decking, loose membranes, cracked fixtures, damaged framing, or poorly installed earlier repairs.
Applying more sealant without diagnosing the cause usually delays proper repair. Replacement may become necessary when chronic leakage affects several roof areas.
Previous Coatings Are Peeling or Incompatible
Older coatings can create difficult preparation problems. Peeling, cracking, bubbling, or poorly bonded layers may need complete removal.
Applying another coating over a failing layer will not improve adhesion. The new material may simply detach with the old coating.
Several different products may also have been applied over time. Their compatibility can be difficult to confirm.
When the surface contains widespread failing material, replacement may be more practical. Otherwise, preparation could require extensive stripping and testing.
How to Inspect Your RV Roof Before Deciding
A careful inspection helps separate surface aging from structural damage. Work safely and follow your manufacturer’s roof-access instructions.
- Inspect the RV interior first. Look for stains, swelling, odors, peeling materials, and discolored ceiling panels.
- Check every roof penetration. Examine vents, skylights, antennas, air conditioners, plumbing vents, and mounting brackets.
- Inspect every roof seam. Look around front caps, rear caps, side rails, trim pieces, and membrane edges.
- Look for membrane damage. Find tears, punctures, bubbles, shrinking edges, lifting sections, and deep cracks.
- Check for sagging areas. Dips can collect water and may indicate weakened decking.
- Gently test accessible sections. Compare suspicious areas with nearby firm sections without forcing the roof.
- Inspect the sidewalls. Delamination or swelling may indicate water has traveled from the roof.
- Review previous repairs. Identify old patches, sealants, tapes, and coating materials.
- Check whether the roof is dry. Moisture below the membrane may require professional testing.
- Document everything. Take photographs before cleaning or removing old materials.
- Inspect from underneath when possible. Cabinets and ceiling openings may reveal hidden staining.
- Request a professional evaluation when uncertain. Moisture meters and thermal tools can reveal concealed problems.
Avoid relying only on roof appearance. A clean-looking surface can still hide wet insulation or damaged wood.
Surface Damage vs Structural Damage
Surface damage affects the exposed roof material. Structural damage affects the components supporting and insulating the roof.
| Roof Condition | Usually Coatable | Needs Repair Before Coating | Usually Requires Replacement |
| Light chalking | Yes | No | No |
| UV fading | Yes | No | No |
| Mild oxidation | Yes | Sometimes | No |
| Fine surface cracking | Yes | Sometimes | No |
| Failed lap sealant | Sometimes | Yes | No |
| Small puncture | Sometimes | Yes | No |
| Localized loose membrane | No | Possibly | Sometimes |
| Small damaged decking area | No | Possibly | Sometimes |
| Widespread soft spots | No | No | Yes |
| Sagging roof section | No | No | Yes |
| Wet insulation | No | No | Usually |
| Major membrane separation | No | Sometimes | Usually |
| Severe wood rot | No | No | Yes |
| Damaged roof framing | No | No | Yes |
| Several peeling coating layers | No | Sometimes | Often |
An isolated damaged area may sometimes be opened and repaired. The remaining sound roof could then receive a complete coating system.
However, several scattered structural repairs can become expensive and complicated. Full replacement may provide a cleaner and more reliable result.
Can You Coat an RV Roof That Is Leaking?
You can coat some leaking RV roofs, but only after finding the leak. The active entry point must be repaired before applying the main coating.
A coating may help waterproof weathered surfaces and repaired seams. It should not be used to hide an unidentified water problem.
Common leak locations include vents, skylights, air conditioners, trim rails, antennas, plumbing vents, and membrane edges.
Old sealant may need removal before resealing these areas. Loose screws, cracked fixtures, damaged gaskets, and separated trim also require attention.
Remember that water can travel underneath the membrane. The interior stain may appear far away from the actual roof opening.
Before coating, confirm the affected roof materials are dry. Wet decking and insulation may continue deteriorating after the visible leak stops.
Can a Roof Coating Fix Soft Spots?
No, a roof coating cannot fix soft spots in an RV roof. Softness usually involves damaged decking, loose layers, trapped moisture, or inadequate structural support.
The affected area should be opened and properly evaluated. Rotten wood, wet insulation, and damaged framing must be removed or repaired.
After rebuilding the soft area, coating may still be possible. The rest of the roof must remain structurally sound and compatible.
Never use a thick coating to make a soft area feel stronger. Coating provides waterproof protection, not structural reinforcement.
Types of RV Roof Coatings
Several coating types are available for RV roofs. Each has different strengths, limitations, and preparation requirements.
Acrylic Roof Coating
Acrylic coatings are commonly chosen for reflectivity and affordability. They often create a bright surface that reduces direct heat absorption.
Many acrylic systems require multiple coats. Proper film thickness is important because thin application reduces durability.
Some acrylic products perform poorly where water remains pooled. Roof slope and drainage should be considered before choosing one.
Acrylic coatings also need suitable weather during application. Rain, humidity, and low temperatures may affect curing.
Silicone Roof Coating
Silicone coatings offer strong resistance to sunlight and standing water. They also remain flexible through temperature changes and normal roof movement.
Many owners choose silicone for its water resistance. However, careful preparation is still essential for reliable adhesion.
Silicone can attract dirt as it ages. This may reduce reflectivity even when waterproofing remains effective.
Future repairs can also become more complicated. Most materials do not bond well to cured silicone without specialized preparation.
Urethane Roof Coating
Urethane coatings are known for abrasion resistance and physical durability. They may suit areas exposed to regular roof traffic or branch contact.
Some systems combine urethane with other coating layers. Product instructions should guide preparation and application.
Strong odors and application requirements can make certain urethane products challenging. Always confirm suitability for recreational vehicles.
Rubberized or Elastomeric Roof Coating
“Elastomeric” describes a coating that can stretch and return toward its original shape. It does not identify one specific chemical formula.
Products marketed as rubberized may use acrylic, silicone, urethane, or other materials. Do not rely only on the front label.
Check the actual chemistry, compatible surfaces, primer requirements, coverage rate, and required thickness.
What Roof Materials Can Be Coated?
Many RV roof materials can receive coatings, but compatibility varies. Always verify the exact product requirements before application.
- EPDM rubber: Often requires specialized cleaning and compatible primers. Petroleum-based products may damage some EPDM materials.
- TPO roofing: Some TPO surfaces are difficult to bond without proper preparation. Product-specific primer or adhesion testing may be required.
- PVC roofing: Only use coatings specifically approved for PVC surfaces. Plasticizers and surface characteristics can affect adhesion.
- Fiberglass: Fiberglass can often be coated after oxidation, wax, dirt, and damaged sealant are removed.
- Aluminum: Metal roofs may require rust treatment, seam repairs, fastener work, and metal-compatible primer.
- Previously coated roofs: Existing material must remain firmly bonded. Loose or incompatible layers require removal before recoating.
Do not assume one coating works universally. A successful system includes compatible cleaners, primers, sealants, and repair materials.
Pros and Cons of Coating an RV Roof
Roof coating offers meaningful benefits when the roof remains sound. It also carries limitations that owners should understand beforehand.
Advantages of RV Roof Coating
- Costs less than complete roof replacement
- Usually creates less project downtime
- Preserves the existing roofing material
- Reduces the amount of discarded roof material
- Creates a seamless protective surface
- Improves resistance to sunlight exposure
- Can reduce repeated spot-patching
- Helps protect repaired seams and penetrations
- May extend the roof’s usable service life
- Can be manageable for experienced DIY owners
- Often improves the roof’s overall appearance
- May improve surface reflectivity
Disadvantages of RV Roof Coating
- Cannot rebuild rotten roof decking
- Cannot replace wet insulation
- May trap undetected moisture
- Requires extensive cleaning and preparation
- Can peel from incompatible surfaces
- Does not correct major membrane separation
- Cannot repair damaged roof framing
- May complicate future repairs
- Requires suitable curing weather
- May need periodic recoating
- Can fail when applied too thinly
- Provides limited value over unstable materials
Coating is valuable when used for the correct problem. It becomes risky when used to avoid necessary structural repairs.
Pros and Cons of Full RV Roof Replacement
Full replacement provides the most complete repair option. However, it also requires greater time, labor, and financial commitment.
Advantages of Full Roof Replacement
- Exposes concealed roof damage
- Allows rotten decking to be replaced
- Provides access to wet insulation
- Allows damaged framing to be repaired
- Corrects severe membrane deterioration
- Removes incompatible previous coatings
- Creates a new roofing surface
- Improves support around roof fixtures
- Can resolve several leak sources together
- Provides clearer documentation for future buyers
- May include stronger workmanship warranties
- Resets much of the roof system
Disadvantages of Full Roof Replacement
- Has a much higher upfront cost
- Requires significantly more labor
- Keeps the RV unavailable longer
- Involves removing roof-mounted equipment
- Creates more discarded material
- May reveal additional costly damage
- Requires careful fixture reinstallation
- Can cause new leaks when poorly installed
- Usually requires professional facilities
- May involve interior ceiling repairs
- Can exceed the RV’s practical value
- Depends heavily on technician experience
Replacement provides major benefits when structural damage exists. However, poor installation can create problems even with new materials.
RV Roof Coating vs Replacement Cost Factors
The final price depends on much more than roof length. Preparation and concealed damage often determine the real project cost.
Roof Coating Cost Factors
Common coating cost factors include:
- RV roof length and width
- Roof material and condition
- Number of required coating layers
- Required dry film thickness
- Cleaner and primer requirements
- Sealant removal
- Seam repairs
- Puncture repairs
- Old coating removal
- Rust treatment on metal roofs
- Removal of surface contamination
- Professional labor rates
- Roof access difficulty
- Fixture masking or temporary removal
- Weather-related scheduling
- Product warranty requirements
A badly prepared coating project may cost less initially. However, peeling or leaking can require repeating the entire process.
Roof Replacement Cost Factors
Replacement prices commonly depend on:
- RV length and roof complexity
- New membrane type
- Amount of rotten decking
- Wet insulation replacement
- Framing repairs
- Interior ceiling damage
- Wall damage near roof edges
- Removal and disposal costs
- Air-conditioner removal
- Vent and skylight replacement
- New trim and molding
- New sealants and adhesives
- Electrical or solar equipment removal
- Shop labor rates
- Storage during repairs
- Warranty coverage
The project can become more expensive after opening the roof. Hidden damage cannot always be priced accurately beforehand.
Why the Cheapest Quote May Cost More Later
A low coating quote may exclude important preparation. It might not include old sealant removal, moisture inspection, primer, repairs, or sufficient coating thickness.
A low replacement quote may exclude damaged decking or fixture repairs. It may also assume every removed component can be reused.
Ask for a written explanation of included work. Compare the process and materials, not only the final price.
How Long Does an RV Roof Coating Last Compared With Replacement?
There is no single lifespan that applies to every coated RV roof. Performance depends heavily on preparation, climate, storage, maintenance, and product thickness.
A well-prepared coating can extend a sound roof’s service life. A poorly prepared coating may begin peeling much sooner.
Constant sunlight, freezing conditions, tree exposure, standing water, and roof traffic affect longevity. Covered storage generally reduces weather-related aging.
A full replacement usually provides a more complete reset. However, new roofs still require regular seal inspections and maintenance.
Replacement does not make an RV roof permanently maintenance-free. Sealants around fixtures can still crack, separate, or loosen.
Coating extends an existing system. Replacement creates a new system after damaged materials are removed.
What Preparation Does an RV Roof Coating Require?
Surface preparation often determines whether the coating succeeds or fails. The roof should be clean, dry, stable, and compatible.
Before applying coating:
- Confirm the exact roof material.
- Verify the coating is compatible.
- Inspect the roof for structural damage.
- Locate every active leak.
- Repair damaged decking before coating.
- Remove loose or peeling material.
- Remove incompatible old sealants.
- Clean away dirt and tree residue.
- Remove oils, waxes, and contaminants.
- Wash away chalky oxidation.
- Treat rust on metal surfaces.
- Allow the roof to dry fully.
- Repair tears and punctures.
- Reseal roof penetrations.
- Apply the required primer.
- Perform a small adhesion test.
- Reinforce vulnerable seams when required.
- Measure the roof accurately.
- Apply the correct product quantity.
- Follow the required curing schedule.
- Protect the roof from rain during curing.
Do not rush the cleaning stage because the roof looks reasonably clean. Invisible residue can prevent proper adhesion.
Common RV Roof Coating Mistakes to Avoid
Most coating failures begin before the roller touches the roof. Avoiding these mistakes can save considerable time and money.
Coating Over Moisture
Water can remain trapped beneath the membrane or inside insulation. Covering it may hide the problem without stopping the damage.
The roof should be thoroughly evaluated after any leak. Interior materials may also need drying or replacement.
Ignoring Soft Decking
Softness is not a cosmetic roof issue. It often signals weakened materials beneath the visible membrane.
Coating does not restore strength. Open and repair the affected roof structure before applying anything.
Skipping the Adhesion Test
A small test patch can reveal compatibility and preparation problems. Skipping this step risks widespread peeling later.
Allow the test area to cure properly. Then check whether the coating firmly bonds without lifting.
Applying Too Little Product
Owners sometimes stretch one container across too much roof area. This creates a thinner membrane than the manufacturer intended.
Measure the roof and follow the stated coverage rate. Include extra material for seams, edges, and textured areas.
Mixing Incompatible Products
Cleaners, primers, sealants, tapes, and coatings must work together. One incompatible product can weaken the entire system.
Old silicone is a common problem because many materials will not bond to it. Complete removal may be difficult.
Coating Over Loose Material
Loose membranes, peeling coatings, and failing sealants create unstable surfaces. New coating cannot permanently secure layers underneath.
Remove everything that is not firmly attached. Repair or replace unstable materials before coating.
Ignoring Roof Penetrations
The main roof surface may not be causing the leak. Vents, antennas, air conditioners, skylights, and trim often create entry points.
Inspect and repair each penetration separately. Do not depend on the field coating alone.
Applying Coating During Poor Weather
Rain, dew, high humidity, extreme heat, or low temperatures may affect curing. Weather can also contaminate freshly prepared surfaces.
Choose a suitable application window. Follow the product’s temperature and moisture requirements carefully.
Treating Coating as a Substitute for Inspection
A clean coating can make any roof look improved. That appearance does not prove the decking underneath is healthy.
Inspect first, repair second, and coat last. Reversing that order can hide serious problems.
Can Part of an RV Roof Be Repaired Before Coating?
Yes, localized roof damage can sometimes be repaired before coating. The damaged section must be fully opened, dried, and rebuilt correctly.
The technician may replace a limited section of decking or insulation. The membrane can then be patched using compatible materials.
After the repair cures, the entire roof may receive coating. This helps create a more uniform protective surface.
Partial repair works best when damage is truly isolated. Several soft areas or widespread moisture may justify full replacement.
The repair should also account for why the damage occurred. Rebuilding wood without correcting the leak simply starts the problem again.
DIY RV Roof Coating vs Professional Installation
A capable owner may coat a structurally sound roof. Structural repair and full replacement usually require greater experience.
| Consideration | DIY Roof Coating | Professional Coating or Replacement |
| Initial expense | Usually lower | Usually higher |
| Inspection experience | Depends on the owner | Generally more extensive |
| Moisture detection | Often limited | May include specialized tools |
| Structural repair ability | Usually limited | Better for major repairs |
| Roof access equipment | Owner must arrange it | Usually provided |
| Product compatibility | Owner must verify | Installer should confirm |
| Surface preparation | Owner-dependent | Follows installer process |
| Application thickness | Requires careful measuring | Usually professionally controlled |
| Warranty | Often material-only | May include labor coverage |
| Best suited for | Sound roofs and capable owners | Uncertain or damaged roofs |
DIY coating may be reasonable when the roof is firm and dry. You should also feel comfortable working safely at height.
Professional help is strongly recommended when you find:
- Large soft spots
- Sagging roof sections
- Wet insulation
- Extensive membrane separation
- Repeated interior leaks
- Damage around an air conditioner
- Roof framing concerns
- Widespread peeling coatings
- Uncertain roof material
- Significant interior water damage
Paying for an inspection can prevent an unnecessary coating project. It can also keep you from replacing a roof that remains restorable.
Questions to Ask an RV Roof Repair Shop
A clear written estimate helps you compare repair methods properly. Ask the shop to explain how it reached its recommendation.
Useful questions include:
- Did you check for trapped moisture?
- How did you evaluate the roof decking?
- Are there soft or rotten sections?
- Is any roof framing damaged?
- Does the insulation need replacement?
- Is the current membrane still attached?
- Is the roof suitable for coating?
- Which coating chemistry will you use?
- Is primer required for this roof?
- How will old silicone be handled?
- Will loose sealant be completely removed?
- How will seams and penetrations be reinforced?
- What coating thickness will be applied?
- How many gallons will the project require?
- Are air conditioners and vents included?
- Will damaged fixtures be replaced?
- What preparation is included?
- What work could increase the final price?
- What does the warranty cover?
- Does the warranty include labor?
- Are periodic inspections required?
- Can you provide before-and-after photographs?
- Can I receive a written repair record?
A trustworthy recommendation should connect directly to the roof’s condition. Be cautious when someone recommends coating without inspecting for structural damage.
How to Decide Between Coating and Full Replacement
The final decision should be based on structural health, not appearance. Use these conditions as a practical starting point.
Choose an RV Roof Coating When:
- The roof decking remains firm.
- The membrane is securely attached.
- The roof is completely dry.
- Damage is mostly surface-level.
- Chalking or fading is the main concern.
- Minor leaks have been identified.
- Damaged seams have been repaired.
- Only small localized patches are needed.
- The existing surface is compatible.
- Old coating remains firmly bonded.
- Proper preparation is possible.
- You want preventive restoration.
Choose a Full Roof Replacement When:
- Soft spots affect large roof areas.
- The decking is rotten or delaminated.
- The roof visibly sags.
- The framing has been weakened.
- Wet insulation remains trapped.
- The membrane has severe tears.
- Large membrane sections are detached.
- Roof edges have significantly shrunk.
- Several leak repairs have failed.
- Water damage reaches interior walls.
- Multiple old coatings are peeling.
- The roof lacks a stable coating surface.
A limited structural repair followed by coating may offer a middle option. This works when the remaining roof remains dry and sound.
Is RV Roof Coating or Replacement Better for Resale Value?
Either option can protect resale value when completed correctly. Buyers generally care about the quality and documentation of the repair.
A properly coated roof can show that preventive maintenance was performed. This is especially helpful when inspection records confirm the decking was sound.
A replacement may provide stronger reassurance after structural water damage. It demonstrates that damaged decking or insulation was not simply covered.
Keep detailed records of every roof project. Useful documents include:
- Inspection reports
- Moisture readings
- Repair photographs
- Product information
- Material receipts
- Installer invoices
- Warranty documents
- Maintenance records
- Annual inspection photographs
A shiny roof without documentation may raise questions. Clear records help future buyers understand exactly what was repaired.
Final Verdict
Choose an RV roof coating when the roof is weathered but structurally healthy. The surface should be dry, stable, firmly attached, and properly prepared.
Choose full replacement when water has damaged decking, insulation, framing, or large membrane sections. Coating cannot rebuild or dry those components.
Do not decide based only on project price or roof appearance. Find out what is happening underneath before sealing the surface.
An early coating can save a healthy roof from further deterioration. A timely replacement can prevent structural damage from spreading through the RV.
Related FAQs
Is It Better to Reseal or Replace an RV Roof?
Resealing or coating is better when deterioration affects seams and surfaces only. Replacement is better when the decking, insulation, framing, or membrane has suffered widespread structural damage.
Can You Put a New RV Roof Over the Old One?
Some roof systems can be installed over an approved existing surface. However, loose membranes, wet insulation, rotten decking, and damaged framing must be removed or repaired first.
How Do I Know Whether My RV Roof Is Rotting?
Common signs include soft areas, sagging, musty odors, ceiling stains, swollen panels, repeated leaks, rusty fasteners, and visible interior delamination.
Does RV Roof Coating Stop All Leaks?
No coating can guarantee every leak will stop. It works best after leak sources, structural damage, wet materials, and failing sealants have been properly repaired.
Can I Coat an EPDM or TPO RV Roof?
Many EPDM and TPO roofs can be coated successfully. The cleaner, primer, sealant, and coating must be compatible with the exact membrane type.
Should Old RV Roof Sealant Be Removed Before Coating?
Loose, cracked, contaminated, or incompatible sealant should be removed. Firm compatible sealant may sometimes remain when allowed by the coating manufacturer.
Can You Walk on an RV Roof to Check for Soft Spots?
Only walk on the roof when the manufacturer permits it. Some roofs require support boards or inspection methods that avoid direct foot pressure.
Is a Soft Spot Always a Sign of Roof Rot?
Not always, but it requires investigation. Softness may involve rotten decking, separated materials, loose adhesive, wet insulation, or inadequate structural support.
Can an RV Roof Be Partially Replaced?
Yes, localized roof sections can sometimes be rebuilt. Partial replacement works best when damage remains contained and the surrounding roof stays structurally sound.
How Often Should an RV Roof Be Inspected?
Inspect the roof regularly and after storms, branch contact, long storage, or interior leaks. Checking sealants several times yearly helps catch problems early.
Can You Coat Over Old RV Roof Coating?
You may coat over old material when it remains firmly bonded and compatible. Peeling, contaminated, or unidentified coatings usually require removal or testing first.
Will Roof Coating Lower the Temperature Inside an RV?
A reflective coating may reduce roof surface heat during direct sunlight. Interior results still depend on insulation, windows, ventilation, shade, and outside temperature.
Does Roof Coating Add Structural Strength?
No, roof coating adds weather protection rather than structural strength. Damaged decking or framing must be repaired before any coating is applied.
Can I Apply RV Roof Coating With a Roller?
Many coatings are designed for roller application. You must still follow the specified roller type, thickness, coverage rate, coat direction, and curing instructions.
Should I Repair Interior Water Damage Before Coating the Roof?
Stop the exterior leak before completing cosmetic interior repairs. Wet insulation, damaged wood, or mold should still be addressed before sealing affected cavities.

David Marshall shares travel route insights, mileage planning tips, and road-tested advice. His writing helps travelers understand distance, timing, and equipment choices. Every article is built around clarity and real-world usefulness.











