
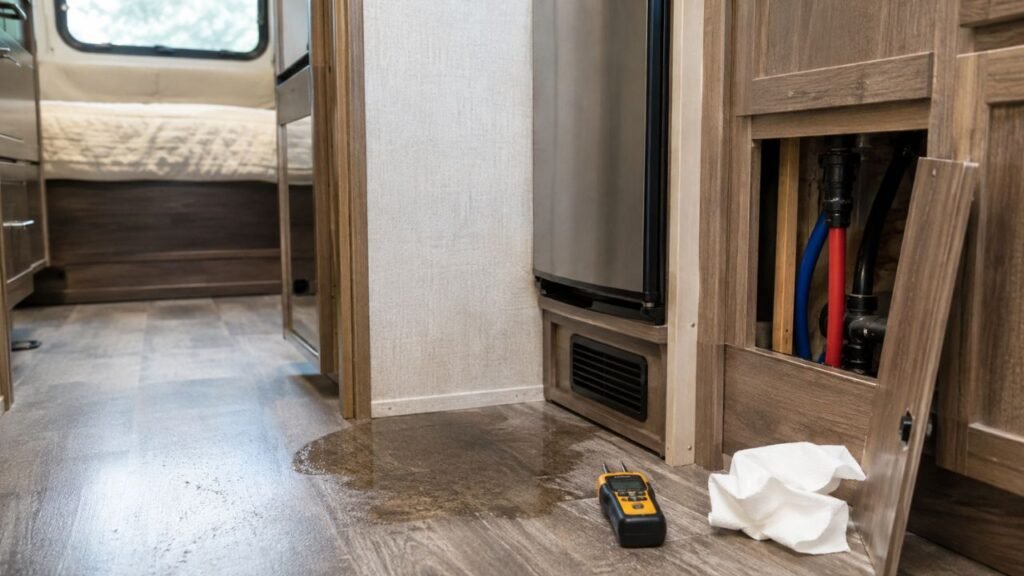
Your RV floor can be wet without a visible leak because water often travels through walls, framing, insulation, cabinets, or flooring layers before appearing. The actual source may be several feet away from the wet area. Hidden plumbing seepage, exterior seal failures, condensation, appliance drainage, and trapped underbelly water are common causes.
I’ll help you narrow down the source step by step. You’ll learn when the water appears, what that timing means, where to inspect, and how to prevent expensive subfloor damage.
Key Takeaways
- Water rarely appears directly beneath its original entry point.
- Roof and window leaks can travel through hidden wall channels.
- Plumbing leaks may appear only under pressure or during fixture use.
- Condensation can create wet flooring without a broken water line.
- A cycling water pump may indicate a hidden freshwater leak.
- Wet underbelly insulation can keep releasing water for several days.
- Soft, swollen, or musty flooring may indicate subfloor damage.
- Controlled testing works better than checking everything at once.
Why an RV Floor Can Be Wet Without a Visible Leak
An RV is full of hidden paths that water can follow. The wet spot you see may only be the lowest place where that water finally escaped.
Water entering near the roof can run down the inside of a wall. It may follow electrical wiring, aluminum framing, wooden supports, or insulation. Once it reaches the floor, it can spread beneath vinyl or laminate before becoming visible.
Water can also move through capillary action. This means absorbent materials pull moisture sideways or upward. Plywood, insulation, carpet backing, and wooden framing can all carry moisture away from the original source.
RV movement complicates the situation further. Water can remain trapped inside a wall, ceiling cavity, cabinet base, or underbelly. It may appear only after you tow the RV, level it differently, or park on a slope.
That is why finding the wettest spot does not always reveal the leak.
Common Causes of a Mysteriously Wet RV Floor
Several systems can create the same symptom. The easiest way to solve the problem is to understand how each source behaves and when it normally produces water.
Water Entering Through the Roof or Sidewall Seams
A small opening in roof sealant can allow surprising amounts of water inside. The opening may be around a roof vent, skylight, antenna, ladder mount, air conditioner, solar cable entry, or roof-to-wall seam.
Once rainwater enters, it can travel inside the ceiling or wall. It may follow framing until it reaches the floor near a cabinet, bed, window, or exterior wall.
The visible wet spot may appear several feet away from the damaged seal. This is especially common when the RV is slightly unlevel.
Look for cracked, separated, lifted, or missing sealant. Pay close attention to corners and places where different materials meet.
Leaking Window, Door, or Compartment Seals
Windows and exterior doors can leak even when their seals look acceptable. Water may enter behind the window frame rather than through the visible glass seal.
Wind-driven rain can push water behind exterior trim, entry doors, storage compartment doors, or access panels. The water may then run down the wall cavity and collect along the floor edge.
A storage compartment leak can also soak the floor from underneath. This may make the interior floor feel damp even though no water is visible inside the compartment.
Check the lower corners of windows and doors carefully. Water often collects there before entering the wall.
Slide-Out Seal or Slide Roof Leaks
Slide-outs create several possible water-entry points. A damaged wiper seal, compressed bulb seal, dirty slide roof, or poorly sealed corner can allow water inside.
Water may sit on top of the slide and enter when you retract it. It can also travel along the slide floor and appear near the center of the RV.
Check the upper corners first. These areas handle large amounts of moving water during rain.
Also inspect the slide topper, when equipped. Debris or fabric sagging may cause water to pool instead of draining away.
Slow Pressurized Plumbing Leaks
A pressurized plumbing leak can remain hidden behind cabinets, under beds, inside walls, or beneath the shower.
Possible sources include:
- Loose PEX fittings
- Cracked plastic elbows
- Damaged supply lines
- Water pump connections
- Toilet supply valves
- Shower faucet fittings
- Water heater connections
- Exterior shower plumbing
- Appliance supply hoses
Some fittings only leak under higher pressure. They may remain dry when the pump is off but begin seeping when connected to campground water.
A very small leak may soak insulation or plywood without creating a visible drip. Eventually, the moisture spreads until it reaches an exposed flooring seam.
Freshwater Pump or Check-Valve Leaks
The freshwater pump area contains several fittings that can loosen or crack. Inspect the inlet hose, outlet hose, filter strainer, threaded adapters, and nearby PEX connections.
A leaking pump strainer may release only a few drops during each pressure cycle. Those drops can slowly soak the cabinet base or subfloor.
The pump’s internal check valve can also cause pressure problems. However, a check-valve failure does not always release water onto the floor. It may instead allow water to move backward toward the freshwater tank.
Listen for unexplained pump cycling. If the pump starts briefly while every fixture is closed, pressure is escaping somewhere.
Water Heater Connections or Relief-Valve Leaks
Water heater leaks often remain hidden behind an exterior access panel or interior cabinet.
Inspect the cold-water inlet, hot-water outlet, bypass valves, drain plug, pressure-relief valve, and tank connections. Water may run along the heater housing before reaching the floor.
A pressure-relief valve can release small amounts of water during heating. Some dripping may occur as water expands, but continuous leaking needs attention.
Water can also enter through a poorly sealed exterior heater frame during rain.
Shower Pan, Drain, or Surround Leaks
A shower may leak only when someone stands inside it. Body weight can flex a weak shower pan, open a hairline crack, or move a loose drain fitting.
The shower may look dry when tested without weight. That makes this problem easy to miss.
Water may also escape through failed sealant around the shower surround, faucet, door frame, or pan edge. It can then enter the wall or floor cavity.
Check the shower access panel while another person uses the shower. Use a flashlight and dry paper towels around the drain and plumbing fittings.
Toilet, Sink, or Faucet Leaks
A toilet supply valve can release water only during flushing. The leak may run behind the toilet and disappear beneath the flooring.
Sink plumbing can also leak from supply lines, faucet connections, drain baskets, P-traps, or loose drain fittings. Water often runs along the bottom of a pipe before dripping somewhere else.
Open the cabinet and remove stored items. Dry everything completely before testing each fixture.
A loose faucet connection may release water only when the faucet is running. A drain leak may appear only when the sink contains several inches of water.
Black-Tank Flush Vacuum Breaker Leaks
Many RV black-tank flush systems include a vacuum breaker or backflow-prevention valve inside the RV.
It may be hidden behind:
- A shower wall
- A bathroom cabinet
- A closet panel
- A removable access cover
- The back of a kitchen cabinet
This component may remain completely dry during normal RV use. It leaks only when the black-tank flush connection is pressurized.
Water can then run inside the wall and appear on the floor several feet away.
If the floor becomes wet shortly after flushing the black tank, inspect this system before looking elsewhere.
Air Conditioner Condensation
An RV air conditioner produces condensation while cooling. That water should drain onto the roof and flow away.
However, condensation may enter the RV when drainage paths are blocked, the evaporator coil freezes, the drain pan overflows, or the roof gasket is loose.
Water may travel through the ceiling before running down a wall. It can eventually appear on the floor under a cabinet or beside an exterior wall.
High humidity can increase condensation considerably. Check whether the wet floor appears mainly while the air conditioner is running.
Refrigerator, Ice Maker, or Washing Machine Leaks
Appliances contain hidden water lines, drain tubes, and pumps.
A refrigerator drain tube may become disconnected or blocked. Instead of draining outside, condensation can collect beneath the refrigerator.
An ice-maker supply line can develop a slow leak behind the appliance. Washing machine hoses and drain pumps may also release water only during certain cycles.
Appliance leaks can remain hidden because the surrounding cabinetry blocks your view.
Inspect the lowest accessible area around each appliance. Water naturally travels downward before spreading across the floor.
Condensation and Moisture Buildup
A wet RV floor does not always mean water is entering from outside.
Warm, humid indoor air can condense on cold flooring, walls, metal framing, and windows. This often happens during cold weather or when the air conditioner creates very cold surfaces.
Common moisture sources include:
- Cooking
- Showering
- Breathing
- Wet clothing
- Drying towels indoors
- Unvented propane heaters
- Poor air circulation
- High outdoor humidity
Condensation often appears along exterior walls, beneath mattresses, inside cabinets, and around slide floors.
Unlike a plumbing leak, condensation usually affects a wider area. You may also notice wet windows or moisture inside cabinets.
Water Trapped in the Underbelly or Insulation
A plumbing or tank leak can soak the insulation beneath your RV floor.
The underbelly covering may trap that water for days. As the insulation becomes saturated, moisture can spread across a large area.
Water may eventually appear through screw holes, floor seams, plumbing penetrations, or damaged underbelly material.
The floor may feel cold, damp, or soft even when the interior plumbing area looks dry.
Check for sagging underbelly panels. A heavy or bulging section may contain trapped water.
Rainwater Forced Under the RV While Driving
Driving through heavy rain can force water into openings beneath the RV.
Possible entry points include:
- Torn underbelly material
- Unsealed pipe openings
- Wheel-well gaps
- Damaged floor edges
- Loose trim
- Storage compartment seams
- Missing sealant around wiring
Wheel spray creates pressure that stationary rain does not. This explains why the floor may become wet after towing but stay dry while parked.
Inspect the underbody around the wet area. Look for gaps facing the tires or road surface.
Previously Trapped Water Reappearing
Sometimes the leak has already stopped, but trapped water continues moving.
Water may sit inside aluminum channels, wooden framing, insulation, ceiling trim, or cabinet bases. Changing the RV’s angle can release that stored water.
You may discover a wet spot several days after rain. It may also appear after driving, extending a slide, or operating the leveling system.
This does not necessarily mean a new leak occurred. However, you still need to find where the water entered and dry the cavity.
What the Wet Floor’s Location May Tell You
The wet area can provide useful clues, but it should not be treated as the exact source. Use the following table to decide where to begin looking.
| Wet Floor Location | Likely Sources | First Areas to Inspect |
| Along an exterior wall | Roof seam, window, trim, wall penetration | Roof edge, window frame, exterior molding |
| Near the shower | Shower pan, drain, faucet plumbing | Drain fitting, pan corners, access panel |
| Beside the toilet | Supply valve, toilet seal, flush system | Toilet line, base, nearby wall cavity |
| Under a bed | Water line, pump fitting, exterior seam | Pump area, PEX fittings, wall-floor joint |
| Near the kitchen | Faucet, sink drain, refrigerator | Cabinet base, P-trap, appliance drain |
| Beneath the air conditioner | Condensation, roof gasket, blocked drainage | Ceiling assembly, gasket, roof drain path |
| Beside a slide-out | Slide roof, corner seal, floor seal | Upper corners, bulb seals, slide floor |
| In the center of the floor | Traveling water, trapped moisture | Nearby walls, appliances, underbelly |
| Wet only after rain | Exterior seal failure | Roof, windows, lights, vents, trim |
| Wet only with city water | Pressurized plumbing leak | Inlet, PEX fittings, toilet, water heater |
| Wet only with the pump | Freshwater plumbing leak | Pump, strainer, tank supply lines |
| Wet after driving | Road spray or trapped water | Underbelly, wheel wells, floor openings |
How to Find the Source of a Hidden RV Floor Leak
Finding a hidden leak becomes easier when you test one system at a time. Avoid using every fixture or spraying the entire RV at once, because that makes the results difficult to interpret.
Step 1: Dry and Mark the Wet Area
Remove rugs, mats, boxes, and furniture from the affected area. Wipe up all visible water.
Use towels, fans, and a dehumidifier to dry the surface. Open nearby cabinets and access panels to improve airflow.
Once the surface is dry, mark the outer edge of the damp area with painter’s tape. This helps you see whether the moisture is spreading or shrinking.
Take photographs before and after drying. They can help with repair decisions, warranty claims, or insurance documentation.
Step 2: Record When the Water Appears
The timing of the water often provides better clues than its location.
Write down what happened before the floor became wet:
- Did it rain?
- Was the RV connected to city water?
- Was the water pump running?
- Did someone shower?
- Was the toilet flushed?
- Was the black tank flushed?
- Was the air conditioner operating?
- Did you tow through rain?
- Did you recently winterize or de-winterize?
Also record whether the RV was level. A change in angle can affect where water appears.
Step 3: Turn Off Every Water Source
Disconnect the city-water hose and switch off the water pump.
Open a faucet briefly to release pressure. Then close every faucet and avoid using the toilet, shower, or appliances that require water.
Dry the floor again and leave the RV undisturbed.
If the area remains dry, a pressurized plumbing source becomes more likely. If it becomes wet after rain, focus on exterior seals.
Remember that trapped moisture may continue appearing temporarily. Give the area enough time to show a clear pattern.
Step 4: Perform the Paper Towel Test
Paper towels make tiny leaks easier to locate.
Place dry pieces around:
- PEX fittings
- Pump connections
- Toilet valves
- Sink drains
- Shower plumbing
- Water heater fittings
- Cabinet edges
- Appliance bases
- Wall-floor joints
Check them regularly. The first towel that becomes damp may reveal the direction water is traveling.
You can also wrap a dry paper towel around a fitting. A slow seep will create a visible wet mark before water reaches the floor.
Step 5: Test the Freshwater System
Fill the freshwater tank enough to operate the pump.
Turn the pump on while every fixture remains closed. Wait until it stops pressurizing the system.
Now listen carefully. The pump should remain quiet.
If it starts briefly every few minutes, pressure is escaping. The cause could be a leaking fitting, dripping fixture, toilet valve, water heater component, or pump check valve.
Inspect every accessible fitting while the system remains pressurized. Run your fingers beneath connections, but keep electrical safety in mind.
Step 6: Compare City Water With Pump Operation
Some leaks appear only when connected to city water.
First, test the system using the freshwater pump. If the floor stays dry, disconnect the pump and connect city water through a pressure regulator.
Watch the suspected area closely.
A leak appearing only on city water may indicate:
- Excessive campground pressure
- A weak PEX fitting
- A damaged city-water inlet
- A failing check valve
- A toilet valve that leaks under higher pressure
- A water heater connection that opens under pressure
Do not leave city water connected unattended during testing.
Step 7: Test Fixtures Individually
Test only one fixture at a time.
Start with the fixture closest to the wet area. Run it briefly, then inspect the floor and hidden connections.
Use this order when practical:
- Kitchen sink
- Bathroom sink
- Toilet
- Shower
- Exterior shower
- Water heater
- Washing machine
- Ice maker
- Black-tank flush system
Wait between tests. Water may need several minutes to travel through a cabinet or wall cavity.
For drain testing, partially fill the sink or shower before releasing the water. A drain joint may not leak under a small flow.
Step 8: Test the Shower With Weight Inside
A shower-pan leak may not appear during a simple water test.
Have someone stand safely inside the shower while another person checks beneath it. Run water around the drain, corners, and pan edges.
Watch for movement around the drain. A loose drain fitting may open when the pan flexes.
Also check the faucet and showerhead connections. Water may run behind the surround instead of entering through the pan.
Step 9: Test the Black-Tank Flush Separately
Connect the flush hose only after other plumbing tests are complete.
Have one person remain inside near the likely vacuum-breaker location. The other person should slowly pressurize the flush system.
Inspect nearby cabinets, walls, and access panels immediately.
Stop the test if water appears indoors. Do not continue pressurizing a leaking system.
Never operate the flush system with the tank valve closed unless your manufacturer specifically permits it.
Step 10: Conduct a Controlled Hose Test
Use a garden hose only after plumbing sources have been ruled out.
One person should stay inside with a flashlight. The other person should wet one small exterior section at a time.
A useful testing order is:
- Lower sidewall and compartment doors
- Windows and entry door
- Slide-out seals and corners
- Roof-to-wall seam
- Roof vents and accessories
- Air conditioner mounting area
Use a gentle flow rather than a powerful spray. High-pressure water can force moisture through areas that do not normally leak.
Wait between sections. Water may take several minutes to reach the interior.
Stop once water appears. Continuing to spray will only add more moisture and confuse the test.
Step 11: Inspect From the Lowest Accessible Point
Water moves downward, so inspect the lowest hidden areas first.
Remove drawers, cabinet kick plates, plumbing access panels, and removable storage covers. Use a flashlight to inspect floor edges and wall bases.
Look for:
- Water stains
- Swollen wood
- Rusted screws
- Damp dust
- Darkened insulation
- Mineral deposits
- Mold spots
- Loose flooring adhesive
Fresh water often leaves a clean wet path. Older leaks may leave brown stains, white mineral residue, or damaged wood.
Step 12: Use a Moisture Meter
A moisture meter can help you map how far the water has spread.
Start in a known dry area and note the reading. Move gradually toward the wet spot and compare the results.
Check:
- Floor edges
- Wall bases
- Cabinet bottoms
- Slide corners
- Areas beneath windows
- Spaces near plumbing fixtures
The highest reading may point toward the water’s path. However, metal framing, fasteners, and different materials can affect readings.
Use the meter as a guide rather than absolute proof.
Step 13: Check Beneath the RV
Inspect the underbelly directly below and around the wet floor.
Look for sagging material, damp screws, torn panels, dripping seams, and water around plumbing penetrations.
Gently press the underbelly material. Stop if it feels heavy or full of water. A large trapped pocket can release suddenly.
Wet insulation may need to be removed. Leaving it enclosed can slow drying and encourage mold, odor, and floor damage.
Step 14: Consider Professional Leak Testing
Call an RV technician when controlled testing does not reveal the source.
A technician may use:
- Plumbing pressure testing
- Thermal imaging
- Borescope cameras
- Moisture mapping
- Positive-pressure exterior leak testing
- Regulated air testing
- Partial wall or floor disassembly
Avoid applying extreme air pressure to RV plumbing. Excessive pressure can damage fittings and create additional leaks.
Follow the RV manufacturer’s pressure limits and service procedures.
How to Tell Plumbing Water From Rain or Condensation
You can often identify the likely category by studying when the moisture returns. This table can help you compare the most common patterns.
| Observation | More Likely Cause |
| Water appears during or after rain | Roof, window, slide, door, or exterior seam |
| Water appears while connected to city water | Pressurized plumbing or inlet leak |
| Pump cycles with every fixture closed | Freshwater leak or check-valve problem |
| Water appears after using one fixture | Fixture supply, drain, or surrounding seal |
| Water appears during black-tank flushing | Vacuum breaker, check valve, or flush line |
| Moisture appears on cold mornings | Condensation |
| Floor dries after ventilation improves | Indoor humidity or condensation |
| Water appears after towing in rain | Underbody intrusion or trapped water |
| Wetness has odor or discoloration | Drain water, tank leak, or contaminated insulation |
| Moisture continues after every source is off | Trapped water or saturated flooring layers |
Can Condensation Really Make an RV Floor Wet?
Yes, condensation can create enough moisture to make an RV floor visibly wet.
RVs have thin walls and limited insulation compared with houses. Interior surfaces can become very cold during winter or air-conditioner use.
When warm, humid air touches those cold surfaces, water droplets form. That moisture may run down walls, collect beneath mattresses, or pool along the floor.
Condensation is especially common:
- Behind furniture placed against exterior walls
- Under mattresses without ventilation
- Inside closed cabinets
- Around slide-out floors
- Near metal framing
- Beside windows
- Under rugs placed on cold vinyl
Use roof vents while cooking or showering. Run exhaust fans and keep cabinet doors slightly open when conditions are humid.
A dehumidifier can help maintain more comfortable indoor moisture levels. Improving airflow beneath mattresses and furniture also reduces trapped condensation.
If the wetness disappears after ventilation improves, condensation becomes a strong possibility.
How to Check Whether the Subfloor Is Damaged
A floor can feel dry on top while the plywood, foam, or insulation beneath it remains wet. Check for both early warning signs and serious structural symptoms.
Signs of Early Moisture Damage
- Darkened flooring edges
- Musty or earthy odors
- Loose sheet vinyl
- Swollen laminate seams
- Damp carpet backing
- Rusted floor fasteners
- Stained cabinet bases
- Repeated high moisture readings
- Discolored wall trim
- Persistent indoor humidity
Early damage may still be repairable without replacing large sections. However, the hidden material must be dried completely.
Signs of Serious Subfloor Damage
- Soft or spongy flooring
- Floor movement under body weight
- Cracking or separated flooring
- Delaminated plywood
- Sagging beneath the RV
- Visible mold
- Crumbling wooden material
- Loose cabinets or furniture mounts
- Dark stains spreading along wall bases
- Strong odors that return after cleaning
A soft floor usually means the problem has progressed beyond surface moisture. Continuing to walk on it may increase the damage.
When the Floor May Need to Be Opened
The floor may need partial disassembly when moisture remains trapped or structural damage is suspected.
This can involve removing vinyl, laminate, carpet, cabinets, wall panels, or sections of underbelly material.
Opening the area allows you to:
- Locate the original leak
- Remove saturated insulation
- Dry the framing
- Treat mold safely
- Check plywood strength
- Replace damaged material
- Reseal plumbing penetrations
Do not cover wet wood with new flooring. Trapped moisture can continue causing rot beneath the finished surface.
What to Do Immediately After Finding a Wet RV Floor
Your first goal is to stop additional water and begin drying. Taking action early can prevent a small problem from becoming a major floor repair.
- Disconnect the city-water supply.
- Turn off the freshwater pump.
- Stop using the suspected fixture.
- Relieve pressure from the plumbing system.
- Remove rugs, boxes, and stored belongings.
- Wipe up standing water.
- Open cabinets and access panels.
- Use fans and a dehumidifier.
- Photograph the wet area.
- Mark the moisture boundary.
- Check nearby electrical equipment.
- Inspect the underbelly for trapped water.
- Avoid sealing the area before it dries.
- Arrange professional help if the floor feels soft.
If water reaches an electrical panel, converter, outlet, or wiring connection, disconnect power safely and seek professional help.
Treat water from gray or black systems as contaminated. Wear protective gloves and disinfect affected surfaces properly.
Mistakes That Make Hidden RV Leaks Harder to Find
Hidden leaks become more frustrating when several possible sources are tested together.
Avoid these common mistakes:
- Spraying the entire roof at once
- Running every fixture during the same test
- Assuming the wet spot marks the entry point
- Ignoring leaks that appear only on city water
- Overlooking black-tank flush components
- Forgetting appliance drain lines
- Ignoring occasional water pump cycling
- Using excessive air pressure in water lines
- Sealing over wet materials
- Leaving saturated insulation enclosed
- Tightening plastic fittings too aggressively
- Replacing flooring before fixing the leak
- Assuming one dry day proves the problem is solved
- Ignoring water that appears only after driving
A careful process may feel slower, but it prevents unnecessary repairs.
Is It Safe to Keep Using the RV With a Wet Floor?
A small amount of surface condensation may not create an immediate emergency. However, recurring unexplained water should never be ignored.
Moisture can damage plywood, insulation, wall framing, cabinets, wiring, fasteners, and flooring adhesive.
Long-term exposure can lead to:
- Wood rot
- Mold growth
- Floor delamination
- Rusted electrical connections
- Damaged insulation
- Musty odors
- Loose fixtures
- Reduced resale value
- Expensive structural repairs
Stop using the water system when a plumbing leak is suspected.
Avoid walking on a soft floor. The damaged section may not support normal body weight safely.
You should also stop using the affected area when water is near electrical equipment or appears contaminated.
When to Call an RV Technician
Some hidden leaks require equipment or access that most RV owners do not have.
Consider professional help when:
- The source remains hidden after controlled testing.
- The floor feels soft, weak, or unstable.
- Water is trapped inside the underbelly.
- Electrical components have become wet.
- Mold or a strong musty smell is present.
- The leak involves a holding tank.
- The wall or floor must be opened.
- A roof pressure test is required.
- The leak returns after sealing.
- Warranty documentation is needed.
- The RV has extensive delamination.
- You cannot safely access the plumbing.
A technician can also confirm whether the floor needs drying, reinforcement, or replacement.
How to Prevent Hidden RV Floor Leaks
Preventive inspections are easier and less expensive than replacing a damaged subfloor. Focus on exterior seals, water pressure, drainage, humidity, and early warning signs.
Inspect Exterior Sealant Regularly
Check roof seams, vents, skylights, antennas, ladders, windows, lights, doors, and exterior trim.
Look for cracking, separation, bubbles, lifting edges, and missing sealant.
Do not simply apply new sealant over dirty or loose material. Prepare the surface properly and use a sealant compatible with the RV material.
Pay extra attention after severe weather, long storage periods, or roof work.
Use a Water Pressure Regulator
Campground water pressure can vary greatly. Excessive pressure places additional stress on fittings, valves, hoses, and appliances.
Use an RV water pressure regulator whenever you connect to city water.
Controlled pressure can reduce stress on:
- PEX fittings
- Toilet valves
- Water heater connections
- Faucet lines
- Ice-maker tubing
- Washing machine hoses
- City-water inlet components
Never leave the city-water connection running unattended when you suspect a leak.
Watch for Unexplained Pump Cycling
Your water pump should stop once the plumbing system reaches pressure.
If it starts again while every fixture is closed, investigate immediately.
A small leak may not create visible water yet. Catching it early can prevent insulation and subfloor damage.
Check the toilet valve, faucets, water heater, pump fittings, and hidden supply lines.
Maintain Roof and Appliance Drainage
Keep roof drainage areas clear of leaves, dirt, and debris.
Inspect air-conditioner drainage, refrigerator drain tubes, slide toppers, gutters, and awnings.
A blocked drain can redirect water into the RV rather than outside.
Also confirm that refrigerator drain tubes extend beyond the exterior access area. A disconnected tube may drain directly into the cabinetry.
Control Indoor Humidity
Use exhaust fans while cooking and showering.
Open windows slightly when weather permits. Use a dehumidifier during humid or cold conditions.
Leave space between furniture and exterior walls. Improve airflow beneath mattresses with a ventilated support layer.
Avoid drying large amounts of wet clothing inside the RV without ventilation.
Inspect the Underbelly
Check the underbelly for sagging, tears, loose fasteners, wet stains, and unsealed openings.
Inspect around tanks, drain lines, freshwater plumbing, and wheel wells.
Repair damaged underbelly material before road spray enters. Seal plumbing and wiring penetrations with appropriate materials.
Test After Winterization or Plumbing Repairs
Leaks often appear after de-winterizing or recent plumbing work.
Before replacing access panels, pressurize the system and inspect every fitting you touched.
Check plastic components for freeze damage. A small crack may open only after the system reaches full pressure.
Continue monitoring the area during the first trip after repairs.
Final Thoughts
A wet RV floor without an obvious leak can feel confusing, but the water always has a source. The difficult part is that the visible wet spot may be far from where the water first entered.
Start by recording when the moisture appears. Then isolate city water, the freshwater pump, individual fixtures, rain exposure, air-conditioner use, and black-tank flushing.
Test one possible source at a time. Dry the area between tests and follow the moisture path instead of focusing only on the visible puddle.
Most importantly, do not leave wet insulation or plywood enclosed. Even after the leak stops, trapped moisture can continue causing rot, mold, odors, and delamination.
Finding the problem early gives you the best chance of completing a simple repair instead of replacing a large section of floor.
Related FAQs
Why Is My RV Floor Wet Only After It Rains?
Your RV likely has an exterior seal failure around the roof, window, slide, vent, light, door, or trim. Water may travel through a hidden wall cavity before appearing on the floor.
Why Is My RV Floor Wet Near the Wall?
Water near a wall often comes from a roof edge, window frame, exterior light, slide seal, or trim seam. It usually runs downward inside the wall before reaching the floor.
Why Is My RV Floor Wet When Connected to City Water?
City-water pressure may expose a weak PEX fitting, damaged inlet, toilet valve, water heater connection, or appliance supply line that does not leak under lower pump pressure.
Why Does My RV Water Pump Run When No Faucets Are Open?
The pump is replacing pressure lost through a leaking fixture, loose connection, water heater component, damaged line, or failing check valve. Inspect the system before the leak worsens.
Can an RV Air Conditioner Make the Floor Wet?
Yes. Blocked drainage, high humidity, a frozen coil, overflowing condensation, or a loose roof gasket can allow air-conditioner water to travel through the ceiling and walls.
Can Water Travel Under RV Vinyl Flooring?
Yes. Water can move beneath sheet vinyl or laminate and spread across the subfloor. It may appear through a seam several feet away from the original source.
How Long Does an RV Subfloor Take to Dry?
Drying may take several days or longer, depending on airflow, temperature, humidity, material thickness, and insulation saturation. Enclosed areas usually need to be opened for proper drying.
Will a Moisture Meter Find an RV Leak?
A moisture meter can identify damp areas and help trace the moisture path. However, it may not reveal the exact entry point without controlled plumbing or exterior testing.
Can a Black-Tank Flush Cause Water Inside the RV?
Yes. A leaking vacuum breaker, check valve, fitting, or flush line can release clean supply water behind a bathroom wall, cabinet, shower, or interior access panel.
Does a Wet RV Floor Always Mean the Subfloor Is Rotten?
No. Recently discovered moisture may not have caused rot yet. However, softness, swelling, odor, delamination, or recurring wetness indicates that the subfloor needs closer inspection.
Why Does the Wet Spot Disappear and Return Later?
Water may remain trapped inside framing, insulation, flooring layers, or the underbelly. It can reappear after towing, leveling, temperature changes, or movement inside the RV.
Can a Refrigerator Cause a Wet RV Floor?
Yes. A blocked or disconnected refrigerator drain tube, leaking ice-maker line, or condensation problem can release water beneath the appliance and into nearby flooring.
Should I Remove the RV Underbelly to Find the Leak?
You may need to open a small section when water is trapped beneath the floor. Use caution because saturated insulation can be heavy and contaminated water may require protective equipment.
Can High Campground Water Pressure Cause a Hidden Leak?
Yes. High pressure can expose weak fittings, valves, supply lines, and plastic connectors. Using an RV pressure regulator reduces stress on the plumbing system.
Is a Soft RV Floor Repairable?
Many soft floors can be repaired after the leak is stopped and the full extent of damage is identified. The damaged plywood, insulation, and framing may require partial replacement.

David Marshall shares travel route insights, mileage planning tips, and road-tested advice. His writing helps travelers understand distance, timing, and equipment choices. Every article is built around clarity and real-world usefulness.











